Game projects usually consist of a combination of more than one piece. Such as, game itself, a backend, a messaging platform, notification system, etc.
In this scenario, we'll create a game project with a .Net 5.0 backend and a Unity3D game project.
We'll create required infrastructure resources on one of the most advanced cloud platform; Microsoft Azure
And we'll store all the codes on GitHub and apply DevOps practices by creating couple of GitHub Actions in the project.
TL;DR, you can find the source code, GitHub Actions and Bash scripts in polatengin/sarajevo repo on GitHub
Let's start with creating the infrastructure on Microsoft Azure
Creating Infrastructure
First, to create infra.sh file in .iac folder, run the following command on terminal;
mkdir .iac && cd .iac

touch ./infra.sh

chmod +x ./infra.sh
chmod command will give executable capability to the infra.sh file, so we can run it by calling it (more details about chmod command can be found on chmod wikipedia page)
./infra.shFirst thing first, let's create couple of variables to hold common information for the infra.sh script;
PROJECT_NAME="sarajevo"
LOCATION="westeurope"
We can find the list of available locations by running the following command;
az account list-locations --output table

DisplayName               Name                 RegionalDisplayName
------------------------  -------------------  -------------------------------------
East US                   eastus               (US) East US
East US 2                 eastus2              (US) East US 2
South Central US          southcentralus       (US) South Central US
West US 2                 westus2              (US) West US 2
Australia East            australiaeast        (Asia Pacific) Australia East
Southeast Asia            southeastasia        (Asia Pacific) Southeast Asia
North Europe              northeurope          (Europe) North Europe
UK South                  uksouth              (Europe) UK South
West Europe               westeurope           (Europe) West Europe
Central US                centralus            (US) Central US
North Central US          northcentralus       (US) North Central US
West US                   westus               (US) West US
South Africa North        southafricanorth     (Africa) South Africa North
Central India             centralindia         (Asia Pacific) Central India
East Asia                 eastasia             (Asia Pacific) East Asia
Japan East                japaneast            (Asia Pacific) Japan East
Korea Central             koreacentral         (Asia Pacific) Korea Central
Canada Central            canadacentral        (Canada) Canada Central
France Central            francecentral        (Europe) France Central
Germany West Central      germanywestcentral   (Europe) Germany West Central
Norway East               norwayeast           (Europe) Norway East
Switzerland North         switzerlandnorth     (Europe) Switzerland North
UAE North                 uaenorth             (Middle East) UAE North
Brazil South              brazilsouth          (South America) Brazil South
Central US (Stage)        centralusstage       (US) Central US (Stage)
East US (Stage)           eastusstage          (US) East US (Stage)
East US 2 (Stage)         eastus2stage         (US) East US 2 (Stage)
North Central US (Stage)  northcentralusstage  (US) North Central US (Stage)
South Central US (Stage)  southcentralusstage  (US) South Central US (Stage)
West US (Stage)           westusstage          (US) West US (Stage)
West US 2 (Stage)         westus2stage         (US) West US 2 (Stage)
Asia                      asia                 Asia
Asia Pacific              asiapacific          Asia Pacific
Australia                 australia            Australia
Brazil                    brazil               Brazil
Canada                    canada               Canada
Europe                    europe               Europe
Global                    global               Global
India                     india                India
Japan                     japan                Japan
United Kingdom            uk                   United Kingdom
United States             unitedstates         United States
East Asia (Stage)         eastasiastage        (Asia Pacific) East Asia (Stage)
Southeast Asia (Stage)    southeastasiastage   (Asia Pacific) Southeast Asia (Stage)
Central US EUAP           centraluseuap        (US) Central US EUAP
East US 2 EUAP            eastus2euap          (US) East US 2 EUAP
West Central US           westcentralus        (US) West Central US
West US 3                 westus3              (US) West US 3
South Africa West         southafricawest      (Africa) South Africa West
Australia Central         australiacentral     (Asia Pacific) Australia Central
Australia Central 2       australiacentral2    (Asia Pacific) Australia Central 2
Australia Southeast       australiasoutheast   (Asia Pacific) Australia Southeast
Japan West                japanwest            (Asia Pacific) Japan West
Korea South               koreasouth           (Asia Pacific) Korea South
South India               southindia           (Asia Pacific) South India
West India                westindia            (Asia Pacific) West India
Canada East               canadaeast           (Canada) Canada East
France South              francesouth          (Europe) France South
Germany North             germanynorth         (Europe) Germany North
Norway West               norwaywest           (Europe) Norway West
Switzerland West          switzerlandwest      (Europe) Switzerland West
UK West                   ukwest               (Europe) UK West
UAE Central               uaecentral           (Middle East) UAE Central
Brazil Southeast          brazilsoutheast      (South America) Brazil Southeast
We need to create a Resource Group to put the project resources in it;
az group create --name "${PROJECT_NAME}-rg" --location "${LOCATION}"A resource group is a container that holds related resources for an Azure solution. The resource group can include all the resources for the solution, or only those resources that you want to manage as a group.
We can create an App Service Plan by running the following command;
az appservice plan create --resource-group "${PROJECT_NAME}-rg" --name "${PROJECT_NAME}-plan" --location "${LOCATION}" --sku "FREE"An Azure App Service Plan provides the resources that an App Service App needs to run.
Only thing missing is the App Service resource itself, let's create it with the following command;
az webapp create --resource-group "${PROJECT_NAME}-rg" --plan "${PROJECT_NAME}-plan" --name "${PROJECT_NAME}-web"Azure App Service is an HTTP-based service for hosting web applications, REST APIs, and mobile back ends. You can develop in your favorite language, be it .NET, .NET Core, Java, Ruby, Node.js, PHP, or Python. Applications run and scale with ease on both Windows and Linux-based environments.
Now, we have the infra that can run the backend project.
Creating Backend Project
To create the backend project, let's create a folder named backend, at the root of the solution;
mkdir backend && cd backendWe'll use dotnet cli to create a WebApi project;
dotnet new webapiWe created the backend project with the webapi template, alternatively we could use another template for the backend, such as, grpc, mvc, web, etc. More information about the templates can be found on dotnet new arguments page
Based on the genre of the game, we need to add code into the backend project, for the sake of simplicity of this post, we're gonna skip adding code into the backend project.
Creating Unity3D Game Project
To create the game project, let's create a folder named game, at the root of the solution;
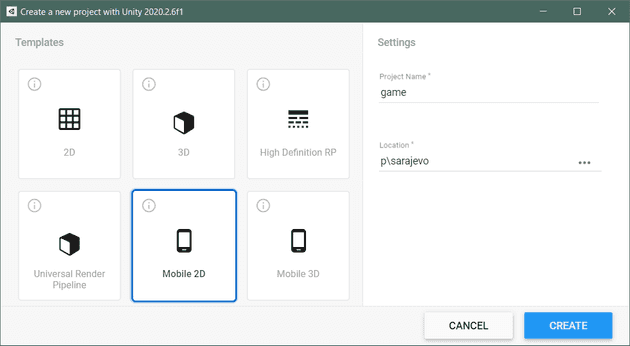
mkdir game && cd gameWe'll use Unity3D v2020.2.6.f1 to create the game project;
Based on the genre of the game, we can select one of the templates at the New Game Creation Dialog, at the time of writing this post, available options are;
- 2D
- 3D
- High Definition RP
- Universal Render Pipeline
- Mobile 2D
- Mobile 3D
After creating the game project, we need to actually develop the game, for the sake of simplicity of this post, we're gonna skip developing a game with Unity3D.
Creating GitHub Actions
We'll use GitHub Actions as the orchestrator of pipelines of this project.
Let's start with creating .github/workflows folder at the root of the solution;
mkdir .github/workflows && cd .github/workflowsCreating GitHub Action for .Net 5 Backend Project
Create a file named backend.yml in the .github/workflows folder
touch backend.ymlOpen backend.yml file with the favorite code editor (in this post we'll use Visual Studio Code) and start with giving a name to our pipeline;
name: ci_backendWe need to define triggers for the pipeline, so pipeline can be start based on an event on GitHub;
on:
  workflow_dispatch:
  push:
    branches:
      - "main"
    paths:
      - "backend/**"
We're using 2 triggers;
- workflow_dispatch, so we can start the pipeline on GitHub UI
- push, so pipeline will automatically start when there is a commit to GitHub
But, since we have .iac, backend and game folders, and don2t want to build and deploy backend when there is a commit to game folder, we add couple of filters to the push trigger;
- branches, so pipeline will start only if the main branch gets a commit
- paths, so pipeline will start only if the listed folders have changed files
We can continue with adding jobs structure to the pipeline, so we can define what type of runner we'll use under-the-hood;
jobs:
  deploy:
    runs-on: ubuntu-latest
    steps:
GitHub provides cloud hosted runners for us, for free, to use them in our pipelines. There are a few flavors we can choose;
- Windows: windows-latest, windows-2019
- Ubuntu: ubuntu-latest, ubuntu-20.04, ubuntu-18.04, ubuntu-16.04
- MacOS: macos-latest, macos-11.0, macos-10.15
Windows and Linux runners have the following hardware specs;
- 2-core CPU
- 7 GB of RAM memory
- 14 GB of SSD disk space
MacOS runners have the following hardware specs;
- 3-core CPU
- 14 GB of RAM memory
- 14 GB of SSD disk space
More details about the hosted runners can be found on GitHub-hosted runners page
First step will be checking out to the branch, so, the runner will have the latest code;
- uses: actions/checkout@v2Then, we need to login to Azure CLI, so we can deploy the backend project code to Azure App Service resource (we provisioned the resource on Creating Infrastructure section)
- name: azure cli login
  uses: azure/login@v1
  with:
    creds: ${{ secrets.AZURE_CREDENTIALS }}
The runner, will need to login to Azure CLI when it's started, but we don't want to leak the credentials to our Azure Subscription
We need to create a Service Principal and store the Service Principal Object in a safe place that the runner can access.
To create the Service Principal, we'll use Azure CLI. Run the following command on your terminal;
az ad sp create-for-rbac --name "sarajevo-sp" --sdk-auth --role contributorWhen the Service Principal Object created, it'll display on the terminal, like below;
{
  "clientId": "<GUID>",
  "clientSecret": "<GUID>",
  "subscriptionId": "<GUID>",
  "tenantId": "<GUID>",
  "activeDirectoryEndpointUrl": "https://login.microsoftonline.com",
  "resourceManagerEndpointUrl": "https://management.azure.com/",
  "activeDirectoryGraphResourceId": "https://graph.windows.net/",
  "sqlManagementEndpointUrl": "https://management.core.windows.net:8443/",
  "galleryEndpointUrl": "https://gallery.azure.com/",
  "managementEndpointUrl": "https://management.core.windows.net/"
}
Copy the output and create a Secret on GitHub
- Go to https://github.com/{ACCOUNT_NAME}/{REPO_NAME}/settings/secrets/actions
- Add a new repository secret
- Paste the output
- Save
Please notice that the name of the secret should be the same with what we're using in the Azure CLI Login step;
- name: azure cli login
  uses: azure/login@v1
  with:
    creds: ${{ secrets.AZURE_CREDENTIALS }}
In the third step, we can set the .Net version to what we're using in the backend project;
- name: Setup DotNet Core
  uses: actions/setup-dotnet@v1
  with:
    dotnet-version: 5.0.x
In the fourth step, we can build and publish the backend project, so the upcoming steps can access the compiled version of it;
- name: build
  run: |
    cd backend

    dotnet restore
    dotnet build --no-restore
    dotnet publish --configuration release --output ./published
In the last step, we actually publish the backend project to the Azure App Service;
- name: Deploy to Azure
  uses: azure/webapps-deploy@v2
  with:
    app-name: "sarajevo-web"
    package: ./backend/published
Now, we're ready to start backend project pipeline, go to https://github.com/{ACCOUNT_NAME}/{REPO_NAME}/actions and click Run workflow button;
Creating GitHub Action for Unity3D Game Project
Create a file named game.yml in the .github/workflows folder
touch game.ymlOpen game.yml file with the favorite code editor (in this post we'll use Visual Studio Code) and start with giving a name to our pipeline;
name: ci_gameWe need to define triggers for the pipeline, so pipeline can be start based on an event on GitHub;
on:
  workflow_dispatch:
  push:
    branches:
      - "main"
    paths:
      - "game/**"
You can find more detailed explanation about the triggers at the Creating GitHub Action for .Net 5 Backend Project section of this post.
We can continue with defining the job;
jobs:
  build:
    runs-on: ubuntu-latest
This time, we'll do something different, before starting steps, we'll define strategy to add matrix to the game project pipeline;
strategy:
  fail-fast: false
  matrix:
    targetPlatform:
      - StandaloneOSX # Build a macOS standalone (Intel 64-bit).
      - StandaloneWindows # Build a Windows standalone.
      - StandaloneWindows64 # Build a Windows 64-bit standalone.
      - StandaloneLinux64 # Build a Linux 64-bit standalone.
      - iOS # Build an iOS player.
      - Android # Build an Android .apk standalone app.
      - WebGL # WebGL.
More detailed information about the strategy and matrix structures can be found on Workflow syntax for GitHub Actions page
Basically, we're telling GitHub Action to run the steps for the job parallely for each of the items in the targetPlatform variable in the matrix node.
So, instead of running steps once, GitHub Action will run the steps more than once (7 times for this example, because there are 7 items in the targetPlatform variable), but in parallel.
First step is the same first step we used in the backend pipeline;
- uses: actions/checkout@v2In the second step, we'll build the Unity3D Game Project, for each of the items in the targetPlatform variable in the matrix;
- name: Unity - Builder
  uses: game-ci/unity-builder@v2.0-alpha-6
  env:
    UNITY_LICENSE: ${{ secrets.UNITY_LICENSE }}
  with:
    targetPlatform: ${{ matrix.targetPlatform }}
    projectPath: "game"
Building a Unity3D Game Project requires a Unity3D License, to get a license, we need to run the following GitHub Action steps one-time;
- id: getManualLicenseFile
  uses: game-ci/unity-request-activation-file@v2

- uses: actions/upload-artifact@v1
  with:
    name: ${{ steps.getManualLicenseFile.outputs.filePath }}
    path: ${{ steps.getManualLicenseFile.outputs.filePath }}
It's better to create a seperate GitHub Action for these steps;
name: onetime_to_get_unity3d_license
on: [ workflow_dispatch ]
jobs:
  license:
    runs-on: ubuntu-latest
    steps:
    - id: getManualLicenseFile
      uses: game-ci/unity-request-activation-file@v2
    - uses: actions/upload-artifact@v1
      with:
        name: ${{ steps.getManualLicenseFile.outputs.filePath }}
        path: ${{ steps.getManualLicenseFile.outputs.filePath }}
When we run this pipeline one-time, it'll create a file, named like, Unity_v2019.2.6f1.alf.zip, we need to download and extract the file to get the Unity_v2019.2.6f1.alf file.
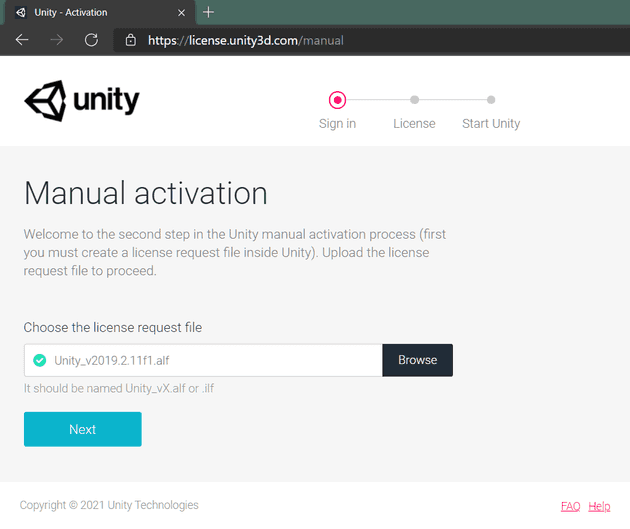
After getting the Unity_v2019.2.6f1.alf file, we need to visit the Unity3D Manual License Activation Page and upload the file.
When the page process the file, there'll be a button to download the license file, named like Unity_v2019.x.ulf
Now we can open Unity_v2019.x.ulf file with the favorite code editor and copy its content, then we can create a new Secret on GitHub
- Go to https://github.com/{ACCOUNT_NAME}/{REPO_NAME}/settings/secrets/actions
- Add a new repository secret
- Paste the output
- Save
Please notice that the name of the secret should be the same with what we're using in the Unity - Builder step;
- name: Unity - Builder
  uses: game-ci/unity-builder@v2.0-alpha-6
  env:
    UNITY_LICENSE: ${{ secrets.UNITY_LICENSE }}
  with:
    targetPlatform: ${{ matrix.targetPlatform }}
    projectPath: "game"
Final step is for uploading compiled artifacts of the Unity3D Game Project;
- uses: actions/upload-artifact@v2
  with:
    path: build/${{ matrix.targetPlatform }}
Now, we're ready to start game project pipeline, go to https://github.com/{ACCOUNT_NAME}/{REPO_NAME}/actions and click Run workflow button;
At the end of the pipeline, we can download artifacts for all of the targetPlatforms, or we can add other steps into the pipeline to sign and publish the artifacts into stores, such as, Microsoft Store, Google Play Store, Apple App Store, etc.


